The purpose of this post is to walk through my complete process for building a custom client portal for my web design and development business using Claude. Think of it as my own personal version of Jira: a project management tool that actively reduces the back-and-forth that eats up everyone's time.
In this portal, clients can review and approve work directly with threaded comments on each request, rather than emailing screenshots back and forth.
A single source of truth for files means clients always know where to find the latest mockup, exported assets, or staging link, instead of hunting through email threads.
Transparent project status means clients never have to email "where are we on this?" They can see exactly what phase the project is in, what's coming next, and whether anything is blocked waiting on them.
A structured change request flow protects me from scope creep, which almost always comes through informal channels. When requests go through the portal, they're documented, timestamped, and far easier to manage.
The process
I start with the idea first.
💡 I want to build a client portal for my web design and development business. I'm using Next.js to build this. Provide me with a high level overview of the pages, tabs, and information I should include in this portal. What types of things should I be asking my clients to provide? What should this portal be able to provide for my clients? This is going to serve as an onboarding tool and a tool for clients to create requests and track work progress.
Claude gives me a comprehensive breakdown of how to structure the portal.
Onboarding is the entry point for every new client. Its job is to collect everything I need before work starts and set expectations upfront. The intake form is the most critical piece.
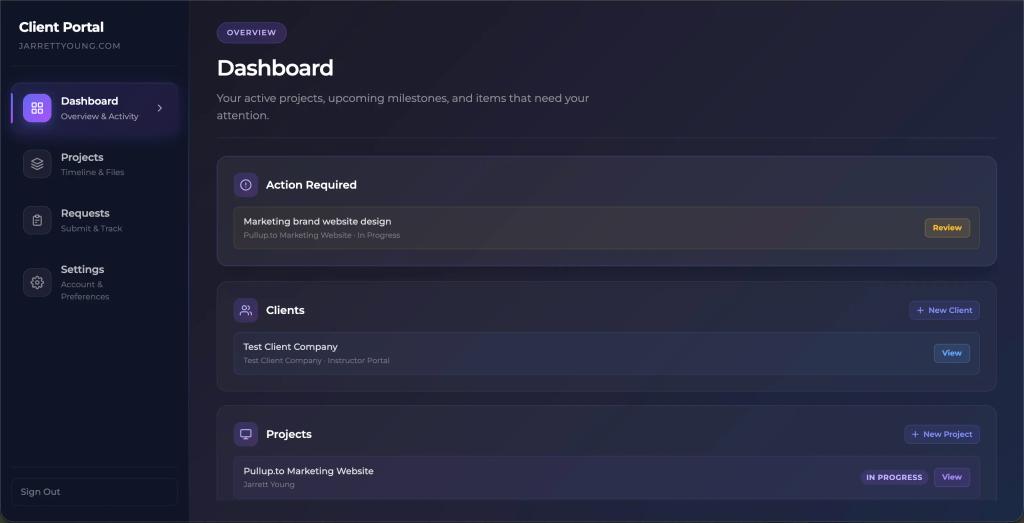
Dashboard serves as the home screen after onboarding is complete. It gives clients an at-a-glance read on project status, recent activity, any pending actions from them (approvals, feedback needed), and upcoming milestones.
Projects is the core of the portal. Each project gets its own detail view with a timeline, phase-based milestones with status badges (planning, in progress, review, complete), deliverables and file downloads, and an approvals flow where clients can leave feedback on specific assets.
Requests lets clients submit new work: bug fixes, content changes, new features, additional pages. A structured form keeps requests organized rather than buried in email threads. Pair it with a tracker so clients can see the status of every open request without having to ask me.
Account covers profile info, billing contacts, notification preferences, and team member access for clients who have stakeholders they want to add.
Planning
Based on this, I had Claude help me write my overall sitemap and structure. What is this app? Who is it for? What is its purpose? What is each page showing, and what is the expected functionality? How are users going to interact with them? Claude expands on the information it previously gave me.
Following Jake Van Clief's foundation guide from his Clief Notes, I then created four different CONTEXT.md files, each in their respective folders.
- The planning/ folder's CONTEXT.md describes the portal's specs, architecture, and decisions. It outlines the app's purpose and functionality.
- The src/ folder's CONTEXT.md describes the actual code writing process.
- The docs/ folder's CONTEXT.md describes my documentation.
- The ops/ folder's CONTEXT.md describes my deploy and debug processes.
At this stage, though, the only CONTEXT.md file I actually had was the planning one.
What to collect during onboarding (intake form)
I wanted to break the intake form into logical sections so it didn't feel overwhelming. I landed on five stages.
Business basics: company name, website URL, industry, target audience, key competitors they're aware of, and what problem the project is solving for their business.
Brand assets: logo files (SVG/PNG), brand colors (hex codes), fonts they're already using, any existing brand guidelines or style docs, and example websites they like or dislike.
Technical details: current hosting provider, domain registrar, CMS if applicable, any third-party integrations they need (CRMs, booking tools, payment processors, email platforms), analytics setup, and access credentials for existing platforms. Collect credentials securely and privately, not via a plain form field.
Content: Who is responsible for providing copy? Do they have photos and videos ready, or do they need sourcing? What's the approval chain? Is there one decision-maker or a committee?
Goals and timeline: What does success look like for this project? Is there a hard launch deadline tied to a product launch, event, or campaign?
Next up: design
This is actually where everything comes together. The design is what helps me figure out the precise functionality I need.
This is also where I did my own coding without Claude's help.
Based on the project spec Claude gave me, I coded all the pages from scratch in HTML and CSS. I used dummy content in place of dynamic content before connecting my database, fleshed out all the design details, and sorted out responsiveness using static HTML and CSS.
Then I created a new GitHub repo, started a new Next.js project, and had Claude convert my raw HTML and CSS to work in the src/app/page.tsx file.
Before you ask why I didn't just have Claude write all the HTML and CSS for me: I'm a front-end developer. I like building things from scratch. It can actually save time because AI-generated code from a design is usually not as precise as I want it to be. I also skipped the Figma stage since I had already worked out in my head how I wanted this to look and behave.
The power of Claude
Once I was happy with the design, I extrapolated all the different components I needed. I grouped them by shared components first, then individual components by the page they live on.
From there, I had Claude help me come up with my component architecture: architecture principles, folder structure, shared primitives, and individual components. This information went into my planning/CONTEXT.md file.
Then I put Claude to work. It extracted each HTML element that needed to become a component and converted them all. It created a components folder and wrote all the individual files. It created my CSS modules. What would normally take me hours, if not days, to build one by one, it did in minutes. 72 minutes, to be exact, at least for this project.
That took a pretty hefty toll on my token usage, so once that was done I took a break and waited for my token session to reset. Which brings us to my next hurdle.
Claude session limit
Claude's process of converting each component used two complete usage sessions. This felt like a problem. Was my planning/CONTEXT.md file too long? Did I set up my markdown files incorrectly?
So I asked Claude to analyze my CONTEXT.md file.
Turns out having an empty src/CONTEXT.md wasn't doing me any favors.
The routing table in CLAUDE.md says "write code, read CONTEXT.md" but the file had nothing in it.
For every session, Claude would have to start cold and re-read page.tsx (~750 lines), dashboard.css, and multiple component files just to orient itself. That consumes a huge chunk of context before any real work starts.
The issue had nothing to do with my planning file. It was the empty src/ file. So I had Claude rewrite both my planning/ and src/ CONTEXT.md files.
💡 The session limit pressure won't go away entirely; writing 30+ component files in one session is inherently expensive, but future sessions should be substantially lighter since they won't need the re-orientation reads.
This seemed to help at first, but then something else came up.
I created another shared component, made some edits to the dashboard, took a break, and came back to a fully refreshed token session. I asked Claude to make a simple change to my planning/CONTEXT.md file to account for these updates, and this seemingly small task used up a whopping 16% of my session tokens.
"That seems really high. Something is still wrong," I thought, so I asked Claude to explain. Here's what it said:
- I used 6 separate Edit calls instead of one Write. That task should have been a single rewrite of the file. Instead I made 6 round trips; each one reads the file, applies the patch, verifies, and fires the IDE hook. One Write with the full updated content would have used roughly 20% of what I actually spent.
- The PostToolUse IDE diagnostics hook fires on every Edit.
- page.tsx is ~800 lines and gets touched often. The more components we extract from it, the less we touch it, but right now it's still the main wiring point.
- The conversation context itself is large. The session summary, memory files, CONTEXT.md files, and system reminders all load into every turn before a single tool is called. </aside>
It had made 6 separate edit calls. So I asked Claude to update the CLAUDE.md file to add editing guidelines and commit this new pattern to memory.
This seemed to help as I continued working. But then another thing happened when I hit 25% usage after a few more exchanges.
I was using the wrong tool for several of these tasks.
Claude Code charges tokens for the entire conversation context on every turn, not just tool calls. Every back-and-forth message, even pure text with no file reads, accumulates. My last several exchanges had been about token efficiency, reviewing documentation, checking .gitignore, asking about hooks. None of those required Claude Code. They had no business being there.
Here's the rule of thumb I landed on:
Use Claude Code for: writing and editing files, running commands, debugging TypeScript errors, wiring up components, and database migrations.
Use Claude Chat for: planning and architecture discussions, "what should we tackle next?" conversations, reviewing documentation, asking conceptual questions, and anything without file I/O.
The token efficiency discussion, the "what's next?" planning, reviewing my CONTEXT.md. All of that should have happened in Claude Chat at zero cost to my Code session. Start a Claude Code session when you have a defined coding task. End it when the task is done.
The nitty gritty
For this project, I have a single portal page with four tabs: Dashboard, Projects, Requests, and Settings. I also have separate Signup, Login, and Onboarding pages.
I also had to keep in mind that two different types of users would be using this: me (the admin) and my clients. My clients fall into two roles: owner and editor.
For my admin view, I needed a "Clients" content card on my dashboard that my clients obviously wouldn't see. This would come into play later when setting up database user policies.
Here's a breakdown of the separate functionalities:
Me (admin)
- Dashboard: respond to incoming requests, attach clients to active projects, view all activity from all clients
- Projects: view timelines and milestones with attached clients, manage files and deliverables, see client approval status (Approved or Change Requested)
- Requests: respond to requests, upload and download files, mark and change statuses
- Settings: manage everything except the profile and contacts card (not needed for me)
Client (owner or editor)
- Dashboard: only see content relevant to their project
- Projects: only see their own content, download files and deliverables
- Requests: only see their own requests, upload files with new requests, cancel requests from the tracker
- Settings:
- Owner: can add and edit team members
- Editor: can only view the owner and other team members, cannot add or edit anyone
The real fun begins
Now that Claude was running much more efficiently, I moved on to wiring up my database. I created a project in Supabase and had Claude write all the SQL commands needed to create my tables. The beautiful thing here was that Claude already had all the context from our earlier work, so it already knew all the tables and data types I needed. That part was a breeze.
Alongside this, I had Claude rewrite my src/ and ops/ CONTEXT.md files to include these updates and understand the database structure.
Almost done!
From there, the remaining work was substantial but well-defined: auth setup, row-level security policies so clients can only see their own data, Supabase migrations, environment variables, API keys, and swapping out all the dummy placeholder content for dynamic rendering.
I also signed up for a free Resend account, which lets me send up to 3,000 emails per month for free. It handles all my invite emails and notifications, so as requests are created and move between statuses, the corresponding assignees get alerted by email.
Then I deployed to Vercel, and voila! I now have a custom client portal, and it only took me a weekend.
Lessons learned
Token usage: setting up Claude to minimize token use was an ongoing task. As soon as I realized I was using Claude Code for things that belonged in Claude Chat, I changed my behavior immediately.
In practice, token usage really only seemed to matter during the initial project setup and the component conversion process. Once that was complete, usage went down significantly as I moved into building individual features. It ended up being far less of a problem than I anticipated.
The right tool for the right job. Claude Code is for building. Claude Chat is for thinking. Keeping those two separate was the single biggest efficiency unlock of the whole project. If you take nothing else from this post, take that.
If you want to see the portal in action or have questions about any part of the process, reach out at hello@jarrettyoung.com.